


A Practical Walkthrough of a Website Accessibility Audit
So, you’ve decided it’s time to check your website’s accessibility. That’s a great first step. But what does an accessibility audit really involve? Many people think it’s just about running an automated scan, getting a score, and calling it a day. If only it were that simple. A real audit goes much deeper, looking at your website from the perspective of people with disabilities. It’s less about chasing a perfect score and more about finding and fixing the actual barriers that stop people from using your site.
This isn’t just about compliance with standards like WCAG or avoiding lawsuits. It’s about people. It’s about making sure a person who can’t use a mouse can still buy your product, or someone who is blind can read your blog posts. An audit is your roadmap to getting there. It shows you exactly where the problems are and what you need to do to fix them. Think of it as a health check for your website, one that ensures it’s welcoming to everyone.
Before You Start: Planning Your Accessibility Audit
Jumping straight into testing without a plan is a recipe for confusion. You’ll end up with a long list of issues but no clear idea of what’s important or where to start. A little planning upfront saves a lot of headaches later. It helps you focus your efforts where they matter most and ensures you test against the right standards for your audience and legal obligations.
Defining Your Goals and Scope
First things first: what are you trying to achieve? Your goal might be to meet a certain legal requirement, like the Americans with Disabilities Act (ADA), or to conform to a specific international standard. The Web Content Accessibility Guidelines (WCAG) are the most common benchmark, with WCAG 2.2 Level AA being the typical target for most organizations. Clearly stating your target; for instance, “Our website’s checkout process must meet WCAG 2.2 AA”; gives you a clear finish line.
Next, define the scope. You probably don’t need to test every single page of a 10,000-page website. Instead, focus on the most important parts. Start with critical user journeys:
- The homepage
- The main navigation and menus
- The process for registering an account or signing in
- Key forms, like your contact or checkout form
- The most popular pages or products
By defining your scope, you make the audit manageable. You can always expand it later, but starting with the essential parts of your site ensures you’re fixing the problems that affect the most users first.
Assembling Your Testing Toolkit
You wouldn’t build a house with just a hammer, and you can’t conduct a proper accessibility audit with just one tool. You’ll need a mix of automated scanners and manual testing aids to get a full picture of your site’s accessibility.
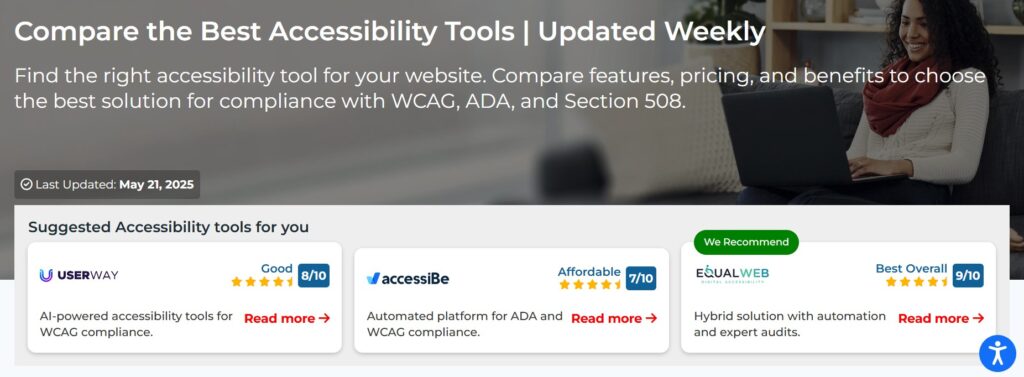
For automated testing, you have many options. Tools like Axe, WAVE, and Google Lighthouse are popular browser extensions that can quickly scan a webpage and flag common issues. These are great for catching low-hanging fruit. Accessibility-Test.org also offers a scanner that can give you a quick snapshot of your site’s health.
For manual testing, your most important tools are the ones people with disabilities actually use. This means getting familiar with:
- Screen Readers: NVDA is a free, open-source screen reader for Windows, while VoiceOver is built into Apple devices. Using these helps you understand how a blind user experiences your site.
- Your Keyboard: Can you use your entire website without touching a mouse? Your keyboard is a fundamental manual testing tool.
- Color Contrast Checkers: Tools like the Color Contrast Analyzer help you check if your text is readable for people with low vision.
Having this mix of tools ready before you begin means you can move smoothly from automated checks to the more detailed manual inspection.
Understanding the Difference: Automated vs. Manual Testing
It’s easy to get excited about automated accessibility scanners. They’re fast, they generate reports, and they seem to find a lot of issues. But here’s the truth: automated tools can only detect about 30-40% of all accessibility problems. They are a great starting point, but they are not a complete solution.
Automated tools are good at catching machine-readable problems. For example, a scanner can easily tell if an image is missing its alt text or if the contrast ratio between two colors is too low. They excel at finding programmatic errors in the code.
However, they can’t tell you if the alt text you’ve written is actually descriptive or makes sense. They can’t tell you if your website’s navigation is logical or confusing. They can’t determine if a keyboard user gets stuck in a “trap” where they can’t navigate away from a component. Only a human can do that. Manual testing is where you find the real usability issues that frustrate users. A good audit relies on both: automation for speed and scale, and manual checks for accuracy and a human-centered point of view.
Phase 1: Running Automated Scans
Once your plan is in place, the first active step in your audit is to run automated scans. This part of the process gives you a high-level overview of your site’s technical accessibility health. It’s the quickest way to identify a baseline of issues that you can start working on. Think of it as the initial diagnostic check you run before you start digging deeper.
Choosing Your Automated Testing Tool
There’s no single “best” automated tool; the right one often depends on your workflow and technical comfort level. Many development teams start with browser extensions because they are so easy to use.
- Axe DevTools is a favorite among developers. It integrates directly into your browser’s developer tools and provides clear explanations for the issues it finds.
- WAVE, developed by WebAIM, is excellent for beginners. It overlays icons directly on your webpage, giving you a very visual way to see errors.
- Google Lighthouse, which is built into Chrome’s DevTools, includes an accessibility audit as part of its overall website quality checks. It gives you a score from 0-100, which can be a helpful, if simplistic, benchmark.
For a quick start, you can use the Accessibility-Test.org website scanner. It’s designed to provide clear, actionable reports without overwhelming you with jargon, making it a good first step for identifying common WCAG failures. The key is to pick one tool and use it consistently across the pages you defined in your scope.
How to Interpret Automated Reports
Running a scan is easy. Understanding the report is the important part. Your report will likely flag a list of violations, and at first, it can look intimidating. Don’t try to fix everything at once. Look for patterns.
Are you seeing a lot of “missing alt text” errors? That points to a systemic problem in how you handle images. Are “low contrast” errors popping up everywhere? Your brand’s color palette might need a second look. Reports from these tools usually group issues by severity, so start with the “critical” or “serious” ones, as these often represent the biggest barriers for users.
For example, an error like “form field missing a label” is a major problem because a screen reader user won’t know what information to enter. An “improper heading structure” error means screen reader users can’t easily skim your content to find what they need. Focus on fixing these high-impact issues first.
The Limits of Automation: What Scanners Always Miss
As we’ve touched on, it’s so important to remember what automated tools can’t do. Relying on them alone gives you a false sense of security. An automated scan can pass a site with a perfect score, yet the site could still be completely unusable for someone with a disability.
Here are a few things scanners almost always miss:
- Keyboard Traps: When a keyboard-only user navigates into a component (like a pop-up modal) and can’t get out.
- Meaningful Alt Text: A scanner can see if alt text exists (alt=”image”), but not if it’s helpful (alt=”A brown dog catching a red frisbee”).
- Logical Reading Order: Does the content make sense when read from top to bottom by a screen reader?
- Clear Link Text: A scanner sees a link. It can’t tell if the link text “Click Here” is confusing compared to “Read our Q3 financial report.”
This is why your audit is only just beginning after the automated scan is complete. The next phase, manual testing, is where you’ll uncover the most serious and nuanced accessibility barriers.
Phase 2: The Manual Testing Deep Dive
This is where the real work begins. Manual testing is about stepping into the shoes of people with different disabilities and experiencing your website the way they do. It’s a hands-on process that requires patience and empathy, but it uncovers the critical usability issues that automated tools will never find. This is how you move beyond simple compliance and start making your site genuinely usable for everyone.
Keyboard-Only Navigation: The Foundation of Accessibility
Before you even think about screen readers, do a thorough keyboard check. Many users with motor disabilities rely entirely on a keyboard or keyboard-like devices to browse the web. If they can’t use your site, nothing else matters.
Unplug your mouse and try to use your website. Use the Tab key to move forward through interactive elements like links, buttons, and form fields. Shift+Tab to move backward. Use Enter or the Spacebar to activate them. As you do this, ask yourself:
- Can I see where I am on the page at all times? There should be a visible outline or highlight around the element that currently has focus. WCAG 2.2 has specific requirements for this.
- Can I reach every interactive element? Or does the focus get stuck somewhere?
- Is the order in which I tab through the elements logical and predictable? Or does it jump all over the page?
- Can I operate everything, including complex menus, sliders, and custom widgets?
If the answer to any of these questions is no, you’ve found a serious accessibility barrier.
Screen Reader Testing: Experiencing Your Site Blind
Screen reader testing is one of the most eye-opening parts of a manual audit. It gives you a direct sense of how someone who is blind or has low vision interacts with your content. Fire up NVDA or VoiceOver and turn off your monitor.
Navigate through your key pages and listen carefully.
- Images: Does every meaningful image have descriptive alt text read aloud? Is decorative imagery properly hidden?
- Headings: Can you use the screen reader’s shortcuts to bring up a list of headings? Do they form a logical outline of the page’s content?
- Links: When you hear a link, is the text clear enough to tell you where it goes? Or do you just hear a long list of “click here” and “learn more”?
- Forms: Are all form fields clearly labeled? When you make a mistake, does the screen reader announce the error and tell you how to fix it?
- Dynamic Content: When something on the page updates without a page reload (like search results or a success message), does the screen reader announce it?
This process takes time to get used to, but it provides invaluable feedback on how well-structured and descriptive your content really is.
Checking Content and Structure
Good accessibility is built on a foundation of clean, semantic HTML. During your manual audit, pay close attention to how your content is structured.
Check your heading hierarchy. Your page should have only one <h1>, which serves as the main title. Subsequent headings (<h2>, <h3>, etc.) should be nested logically without skipping levels (e.g., don’t jump from an <h2> to an <h4>). This structure is what screen readers use to allow users to skim the page.
Examine your forms. Are related fields grouped together? Instructions clear and available before the user needs to input information? Are required fields marked in a way that doesn’t rely on color alone?
Look at your links and buttons. Is the text descriptive? A link that says “Read more about our accessibility services” is far better than a generic “Read more.” This clarity helps all users, not just those using assistive technology.
Mobile Accessibility and Responsive Design Checks
More people browse the web on their phones than on desktops, so don’t forget to test your site on a smaller screen. But mobile accessibility is more than just making sure your site’s layout adapts.
With your phone, check for these common issues:
- Touch Targets: Are buttons and links large enough to be easily tapped without accidentally hitting something else? WCAG 2.2 specifies a minimum touch target size for a reason.
- Zooming: Can you pinch-to-zoom to enlarge the content? Disabling zoom is a major accessibility failure for users with low vision.
- Orientation: Does the site work in both portrait and landscape mode? Users who have their devices mounted in a fixed position (like on a wheelchair) may not be able to rotate them.
- Consistency: Does the mobile site provide all the same features and information as the desktop site? Hiding content on mobile can mean some users never get access to it.
Your site should be just as usable on a phone as it is on a desktop. This manual check ensures that it is.
Phase 3: Compiling Findings and Creating a Plan
You’ve run your scans and completed your manual testing. Now you probably have a long list of issues, from minor contrast problems to critical keyboard traps. The next phase is about turning this raw data into a clear, prioritized plan of action. Without this step, your audit is just a collection of facts. With it, it becomes a powerful tool for change.
Documenting and Prioritizing Issues
The first step is to document everything you found in one place. A simple spreadsheet often works well. For each issue, you should record:
- What the issue is: (e.g., “Checkout button is not keyboard accessible”).
- Where it is located: (The URL and a screenshot or description of the location).
- The standard it violates: (e.g., “WCAG 2.2, Success Criterion 2.1.1 Keyboard”).
- Who it affects: (e.g., “Keyboard-only users, screen reader users”).
Next, you need to prioritize. You can’t fix everything at once. A good way to prioritize is to consider two factors: severity and frequency. Severity is how much the issue blocks a user. A checkout button that doesn’t work is a critical blocker. A typo in the alt text of a decorative image is a low-severity issue. Frequency relates to how many users will encounter the problem. An issue on your homepage is more urgent than one on an obscure, rarely visited page.
Focus on fixing the high-severity issues in your most critical user journeys first. This ensures you’re dedicating your resources to the problems that have the biggest negative impact on your users.
Creating an Actionable Remediation Plan
Once your issues are documented and prioritized, it’s time to create a remediation plan. This is the document you’ll give to your developers and designers to tell them what needs to be fixed.
A good remediation plan doesn’t just list problems; it suggests solutions. For each issue, provide clear, actionable steps for the fix. For example, instead of just saying “Fix color contrast,” you might say, “Change the body text color from light gray (#999999) to dark gray (#333333) to meet the minimum 4.5:1 contrast ratio against the white background.”
Assign each task to a person or team and set realistic deadlines. This accountability is key to making sure the work actually gets done. Your goal is to create a clear roadmap that anyone on your team can understand and follow. This plan transforms your audit findings from a list of complaints into a series of achievable tasks.

Beyond the Audit: Maintaining Compliance
An accessibility audit is a snapshot in time. Your website, however, is constantly changing. You add new content, update features, and redesign pages. If you treat accessibility as a one-time project, your site will quickly fall out of compliance again. The real goal is to bake accessibility into your everyday processes so that your website stays usable for everyone over the long term.
Integrating Accessibility into Your Workflow
The most effective way to maintain an accessible website is to stop thinking of accessibility as a separate step at the end. It needs to be part of your team’s regular workflow, from design to development to content creation.
When designers are creating new mockups, they should be checking color contrast and planning for logical heading structures. When developers are writing code, they should be doing keyboard testing and writing semantic HTML from the start. Tools like Axe have integrations that can be built into your development process (CI/CD), automatically checking for issues before new code even gets published.
When content editors add a new blog post, they should be responsible for writing good alt text for images and using headings correctly. Training your entire team on the basics of accessibility ensures everyone shares responsibility. It shifts the mindset from “fixing accessibility problems” to “building accessible products” from the very beginning.
The Importance of Regular Monitoring
Even with the best intentions, issues can slip through. That’s why ongoing monitoring is so important. You should plan to conduct regular, smaller-scale accessibility checks to catch new problems as they appear.
Set up scheduled automated scans of your most important pages. A weekly or monthly scan can alert you to any new, obvious errors that have been introduced. This acts as your first line of defense.
In addition, plan for periodic manual mini-audits. Maybe once a quarter, you can spend a few hours doing a manual check of your main user journeys, like the checkout process or the contact form. This helps you catch the kinds of issues that automated tools miss and ensures your most critical functions remain usable. Keeping your accessibility statement up-to-date with your latest findings is also a requirement for standards like the European Accessibility Act (EAA). This ongoing cycle of testing and fixing is what keeps your site accessible for the long haul.
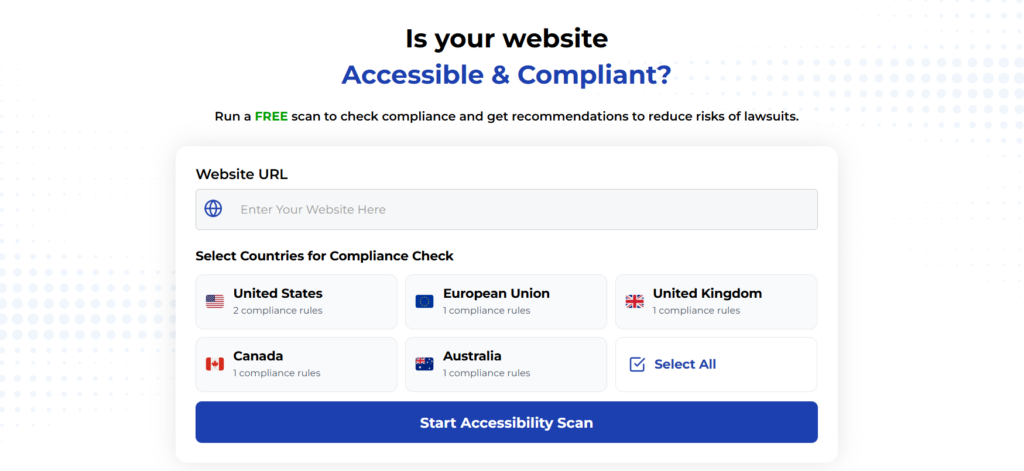
Using Automated Tools for Quick Insights (Accessibility-Test.org Scanner)
Automated testing tools provide a fast way to identify many common accessibility issues. They can quickly scan your website and point out problems that might be difficult for people with disabilities to overcome.
Visit Our Tools Comparison Page!
Run a FREE scan to check compliance and get recommendations to reduce risks of lawsuits
Final Thoughts
An accessibility audit can seem like a big undertaking, but it’s a worthwhile one. It gives you a clear and honest look at how well your website serves all of your users. By moving through the phases of planning, automated testing, manual testing, and remediation, you can systematically remove barriers and create a more welcoming digital experience.
Ready to get a first look at your site’s accessibility? Start by running a free scan with the Accessibility-Test.org website scanner. It’s a quick and easy way to identify immediate improvement opportunities and take the first step toward a more inclusive website.
Run a Free Scan to Find E-commerce Accessibility Barriers
Curious about where your site stands? An automated scan is a great first step to identify potential accessibility issues on your e-commerce platform. Run a free scan on our website today to get an initial report on your site’s accessibility health.
Want More Help?
Try our free website accessibility scanner to identify heading structure issues and other accessibility problems on your site. Our tool provides clear recommendations for fixes that can be implemented quickly.
Join our community of developers committed to accessibility. Share your experiences, ask questions, and learn from others who are working to make the web more accessible.