


How to Test Mobile App Accessibility on iOS and Android
It’s easy to forget just how central our phones are to our daily lives. From ordering groceries to banking and connecting with friends, mobile apps are the gateway. But what if that gateway is closed? For millions of people with disabilities, an inaccessible app isn’t just an inconvenience; it’s a barrier to participation in modern life. This is why mobile accessibility testing isn’t just a box-ticking exercise. It’s about people.
Have you ever stopped to think about how someone who can’t see your app’s screen navigates it? Or how a person with limited hand mobility interacts with tiny buttons? These are the questions at the heart of mobile accessibility. It’s the practice of making sure your iOS and Android apps are usable by everyone, regardless of their abilities. It involves checking everything from screen reader compatibility to the size of your touch targets.
Why Mobile Accessibility Testing is So Important in 2025
Ignoring mobile accessibility is no longer an option. The world has shifted to a mobile-first mindset, and your user base is more diverse than you might think. Failing to account for users with disabilities doesn’t just shrink your potential market; it also opens you up to legal risks and, most importantly, results in a poor user experience for a significant portion of the population.
Mobile Usage and Disability Impact
Think about how often you use your phone each day. Now, consider that a huge number of people rely on their mobile devices as their primary tool for accessing the internet and digital services. When apps aren’t built with accessibility in mind, it directly excludes people. For example, a person with a visual impairment might rely on a screen reader like VoiceOver or TalkBack to navigate an app. If buttons are unlabeled, they won’t know what to tap.
Similarly, someone with a motor disability might use Switch Access to interact with their device. If your app requires complex gestures or has small, tightly packed buttons, it can become impossible for them to use. These aren’t edge cases. They are everyday scenarios for millions of people. Making your app accessible is a direct way to ensure your digital product is open to everyone.
Legal Requirements for Mobile Apps
The legal reasons for mobile accessibility are becoming increasingly firm. Laws like the Americans with Disabilities Act (ADA) in the United States have been interpreted by courts to apply to digital properties, including mobile apps. This means that failing to provide an accessible experience can lead to legal action.
Beyond the ADA, other regulations and standards like Section 508 of the Rehabilitation Act (for federal agencies) and international standards like the Web Content Accessibility Guidelines (WCAG) set clear benchmarks. WCAG is often the standard that organizations aim for, as its principles cover a wide range of accessibility needs. While the legal landscape can seem complicated, the core message is simple: you are responsible for making your app usable by people with disabilities. But beyond avoiding lawsuits, think of it as a positive requirement to build better, more inclusive products.

iOS Accessibility Testing with VoiceOver
For Apple users, VoiceOver is the built-in screen reader that provides spoken feedback to help users navigate their devices. Testing with VoiceOver is a fundamental part of checking your iOS app’s accessibility. It gives you firsthand experience of how a blind or low-vision user interacts with your app.
Setting Up VoiceOver for Testing
Getting started with VoiceOver is straightforward. You don’t need any special equipment; just an iPhone or iPad.
- Go to Settings.
- Tap on Accessibility.
- Tap on VoiceOver and toggle it on.
Once enabled, the way you interact with your device will change. A single tap will select and read an item, and a double-tap will activate it. You’ll swipe with three fingers to scroll. It can feel awkward at first, but spending time with it is the only way to understand the user experience you’re creating. There’s also a “VoiceOver Practice” area on the same screen, which is a great place to learn the basic gestures without affecting your device’s settings.
Key iOS Accessibility Features to Test
When you’re testing with VoiceOver, you’re not just looking for crashes. You’re evaluating the user experience. Here are a few key things to check:
- Labels and Hints: Are all buttons and controls clearly labeled? An icon of a shopping cart is obvious to a sighted user, but a screen reader user only hears “button” unless you’ve provided an accessible label.
- Focus Order: As you swipe right to move through the app, does the focus move in a logical order? It should follow the visual flow of the screen, typically from top to bottom, left to right. A jumbled focus order can make an app completely disorienting.
- The Rotor: The Rotor is a powerful VoiceOver feature that lets users quickly jump to specific types of content, like headings, links, or form controls. If your app has a long article or a complex form, are you using headings correctly so a user can use the Rotor to skip to the section they need?
Common iOS Accessibility Issues
Many apps fail at the same basic hurdles. When you start your testing, keep an eye out for these common problems:
- Images Without Descriptions: If an image conveys important information, it needs alternative text (alt text) so a VoiceOver user understands its purpose. If it’s just decorative, it should be hidden from the screen reader.
- Unlabeled Icons: This is perhaps the most frequent issue. Every icon that performs an action needs a text label that VoiceOver can read.
- Non-functional “Done” Buttons: Imagine filling out a form but not being able to submit it. If the “Done” or “Submit” button isn’t accessible to VoiceOver, the user is stuck.
- Trapped Focus: Sometimes, a user can get their focus “trapped” inside a pop-up or a specific part of the app, with no way to navigate out. This is a critical barrier that can force a user to close the app entirely.
Android Accessibility Testing with TalkBack
On the Android side, TalkBack is the native screen reader. It functions similarly to VoiceOver, providing spoken feedback, but it has its own unique set of gestures and features. Just like with iOS, testing directly with TalkBack is essential for understanding the accessibility of your Android app.
TalkBack Setup and Navigation
Enabling TalkBack is just as simple as on iOS. The exact path might vary slightly depending on your device’s manufacturer, but it’s generally found here:
- Open Settings.
- Go to Accessibility.
- Select TalkBack and turn it on.
With TalkBack, you swipe right and left to navigate between elements, and you double-tap to activate whatever is in focus. It also features global and local context menus, which allow users to access controls for navigation (like moving by heading or link) and text editing. Getting familiar with these menus is part of learning how to test effectively on the platform.
Android Accessibility Service Testing
Beyond TalkBack, the Android operating system offers a suite of accessibility services that cater to different needs. Testing with these services helps you account for a wider range of disabilities.
- Select to Speak: This service allows users to tap on an item to hear it read aloud, without the full navigational changes of TalkBack. It’s useful for people with low vision or reading disabilities who may only need occasional help. Check if it correctly identifies and reads the text in your app.
- Magnification: This feature lets users zoom in on any part of the screen. Does your app’s layout break or become unusable when a user magnifies it? Text should reflow, and all elements should remain visible and functional.
Switch Access and Voice Access Testing
For users with significant motor impairments, tools like Switch Access and Voice Access are indispensable.
- Switch Access: This service allows users to control their device using external “switches” (like a button or a puff-and-sip device) instead of the touch screen. It works by scanning through the items on the screen one by one, letting the user select an item when it’s highlighted. For Switch Access to work, every interactive element in your app must be focusable. Can you navigate and use your entire app without touching the screen?
- Voice Access: As the name suggests, Voice Access lets users control their device with spoken commands. Users can say things like “tap next” or “scroll down.” This relies on your app having clear, visible text labels on its controls. If a button only has a vague icon, a Voice Access user won’t know what command to speak to activate it.
Mobile-Specific Accessibility Needs
While many accessibility principles apply to both web and mobile, some are particularly important in the context of a smaller, touch-based interface. Getting these right is key to a good mobile experience for everyone.
Touch Target Size and Spacing
Have you ever tried to tap a tiny link or button on your phone and accidentally hit the one next to it? It’s a frustrating experience for anyone, but for someone with a motor tremor or larger fingers, it can make an app unusable.
WCAG has specific requirements for this. The minimum recommended size for a touch target; the area that responds to a tap; is 44×44 CSS pixels. It’s not just about the visible size of the icon; it’s about giving users a generous, tappable area. Equally important is the spacing between targets. If buttons are crammed together, the risk of tapping the wrong one increases dramatically. A little extra white space can make a world of difference.
Gesture Alternatives
Swiping to delete an email or pinching to zoom a map are common gestures that many of us use without a second thought. But what if you can’t perform those gestures? Many people with motor disabilities cannot perform complex, multi-finger, or path-based gestures.
Because of this, any action that is initiated by a gesture needs to have an alternative method that doesn’t require it. For instance, if you can swipe to delete an item from a list, there should also be a visible button (perhaps under an “edit” menu) that performs the same action. This ensures that no one is locked out of a feature simply because they can’t perform a specific motion.
Screen Orientation and Zoom Testing
Many people mount their phones on their wheelchairs in a fixed landscape orientation. If your app forces users into portrait mode, it immediately becomes inaccessible to them. Your app should support both portrait and landscape orientations, and the layout should adapt gracefully to each. Nothing should be cut off, and all functionality should remain available.
Similarly, users with low vision often rely on their device’s zoom functions to read text. Your app must allow users to pinch-to-zoom or use the system’s magnification features without the content becoming jumbled or unreadable. Text should reflow to fit the screen, preventing the need for horizontal scrolling, which can be very difficult for some users to manage.
Top Mobile Accessibility Testing Tools
A good accessibility testing process uses a mix of automated tools and manual checks. One can’t replace the other; they work together to give you a fuller picture of your app’s accessibility.
Automated Mobile Testing Solutions
Automated tools are great for catching some of the low-hanging fruit. They can quickly scan your app and find issues like missing labels, insufficient color contrast, or small touch targets.
- For Android, Google provides the Accessibility Scanner app, which you can download from the Play Store. It overlays a button on your screen that you can tap to scan the current view for basic issues.
- For iOS, Apple’s development environment, Xcode, has a built-in accessibility inspector that can help you identify problems during the development process.
While these tools are fast and helpful, remember that they can only catch a fraction of all potential accessibility problems. They can’t tell you if your focus order is logical or if your button labels make sense in context. That’s where manual testing comes in.
Manual Testing Approaches
There is no substitute for navigating your app with the same tools that people with disabilities use every day. Manual testing is the only way to find many of the most serious accessibility barriers.
This means activating VoiceOver or TalkBack and trying to complete key tasks within your app. Can you log in? Search for a product? Can you complete a purchase? Document every hurdle you encounter. This process doesn’t just find bugs; it builds empathy and gives you a much deeper understanding of how your design and development choices affect real people. It’s also a good idea to involve users with disabilities in your testing process to get direct feedback.
Building Mobile Accessibility Test Plans
To make your testing effective and repeatable, you need a plan. A test plan brings structure to your efforts and ensures that you’re checking for the most important issues in a consistent way.
Your plan should outline the key user flows of your app. For an e-commerce app, this would include searching for an item, adding it to the cart, and checking out. In the case of a social media app, it would be posting an update or messaging a friend. For each flow, you should run through it using different accessibility tools, like a screen reader, magnification, and Switch Access if possible.
Your plan should also define which devices and operating system versions you’ll test on. An issue that appears on an older version of Android might not exist on the latest one. By documenting your process and your findings, you create a valuable resource that your team can use to track progress and prevent the same mistakes from happening again.

Common Mobile Accessibility Hurdles and Fixes
Many apps stumble over the same accessibility problems. Here are some of the most common barriers you’ll find during testing, along with how to approach fixing them.
- The Problem: Icons and buttons have no text labels. A VoiceOver or TalkBack user just hears “button, unlabeled.”
- The Fix: Work with your developers to ensure every interactive element has a clear, concise accessible name. For an “add to cart” icon, the label should be exactly that: “Add to cart.”
- The Problem: The focus order jumps randomly around the screen, making navigation confusing.
- The Fix: The reading order should generally follow the visual order. Developers can control this programmatically to ensure that as a user swipes through the screen, they move from one element to the next in a logical sequence.
- The Problem: Important images, like charts or infographics, have no text descriptions.
- The Fix: Provide descriptive alt text for any image that conveys information. The description should be succinct but capture the essence of what the image is showing. Purely decorative images should be hidden from screen readers.
- The Problem: Text and background colors don’t have enough contrast, making them hard to read for people with low vision or color blindness.
- The Fix: Use a color contrast checker tool to ensure your text meets the minimum WCAG ratio of 4.5:1 for normal text. This simple check can dramatically improve readability for many users.
Making your mobile apps accessible is an ongoing process, not a one-time fix. It requires commitment from your entire team; designers, developers, and testers. By integrating these testing practices into your workflow, you’re not just complying with legal standards. You’re making a conscious decision to build products that work for everyone.
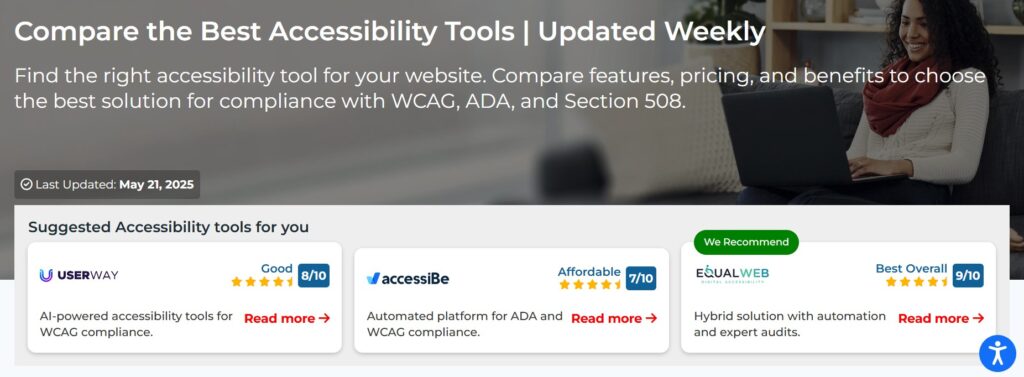
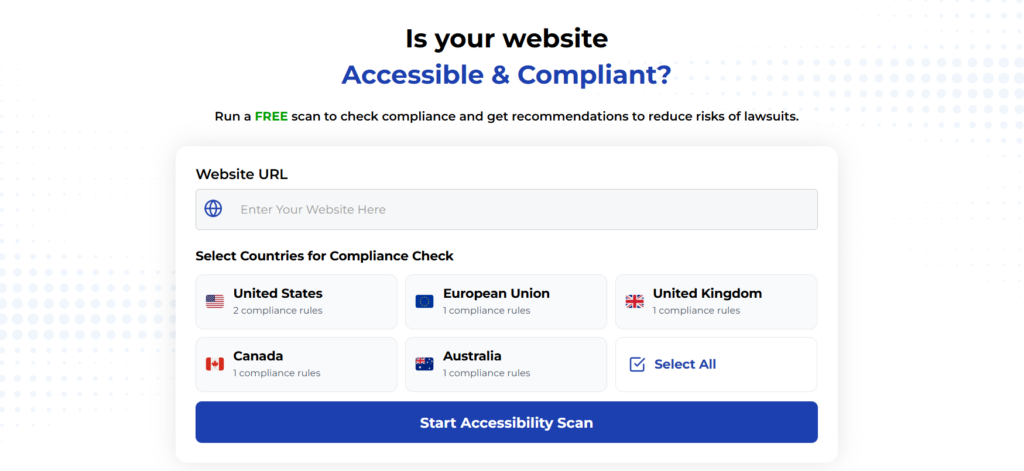
Using Automated Tools for Quick Insights (Accessibility-Test.org Scanner)
Automated testing tools provide a fast way to identify many common accessibility issues. They can quickly scan your website and point out problems that might be difficult for people with disabilities to overcome.
Visit Our Tools Comparison Page!
Run a FREE scan to check compliance and get recommendations to reduce risks of lawsuits
Final Thoughts
Ready to find out where your app stands? A good first step is to run an accessibility check to identify the most pressing issues. From there, you can begin the rewarding work of making your digital world open to all.
Start your compliance journey, update your accessibility statement, and keep EAA top of mind in every project going forward.
Commit to accessibility testing today. The sooner you start, the sooner everyone can benefit from your content and services; no exceptions.
Run a Free Scan to Find E-commerce Accessibility Barriers
Want More Help?
Try our free website accessibility scanner to identify heading structure issues and other accessibility problems on your site. Our tool provides clear recommendations for fixes that can be implemented quickly.
Join our community of developers committed to accessibility. Share your experiences, ask questions, and learn from others who are working to make the web more accessible.