


Your First Steps in Manual Web Accessibility Testing
So, you’ve run an automated accessibility scan on your website. The report came back with a list of issues; missing alt text, some color contrast problems, maybe a few heading errors. That’s a great first step. Automated tools are fantastic for catching common, code-based errors across hundreds of pages in minutes. But if you stop there, you’re only seeing part of the picture.
What the automated scanner can’t tell you is whether your website is actually usable for a person with a disability. It can’t tell you if the checkout process is confusing for a screen reader user, or if someone who can’t use a mouse gets stuck in a pop-up window. That’s where manual accessibility testing comes in. It’s the process of putting yourself in your users’ shoes; or, more accurately, using your website with the same tools they do. This isn’t about ticking boxes on a compliance checklist; it’s about discovering the real-world barriers that frustrate people and cause them to leave your site.
Why Bother with Manual Testing When Automation Exists?
It’s a fair question. Why spend time manually checking pages when a machine can do it instantly? Think of it this way: an automated scanner is like a spell checker. It’s brilliant at finding typos (technical errors), but it has no idea if your writing is persuasive, clear, or even makes sense. It can’t appreciate the story. Automated tools are incredibly valuable and can catch up to 57% of accessibility issues, but that leaves a huge gap where serious problems can hide.
Automated tools check for things that are either present or absent in the code. Does an image have an alt attribute? Yes or no. Is the color contrast ratio sufficient? Yes or no. But they can’t understand context. An automated checker can confirm that an image has alt text, but it can’t tell you if that alt text is “image of a happy customer” when it should be “Woman in a red coat smiling while holding a smartphone.” One is just a label; the other provides real information.
Manual testing bridges that gap. It uncovers the usability and contextual issues that automation misses. These are often the most frustrating barriers for users; the ones that make a website technically compliant but practically unusable. It’s the difference between a building having a ramp and that ramp actually leading to the front door instead of a brick wall.
The Essential Manual Testing Toolkit: What You Already Have
Getting started with manual accessibility testing doesn’t require a big budget or fancy software. In fact, you probably have everything you need right now. The most powerful tools for your first manual checks are surprisingly simple and already built into your computer.
Your primary toolkit includes:
- Your Keyboard: The single most important tool for manual testing.
- A Screen Reader: Every major operating system has a free, built-in screen reader. Windows has Narrator (though NVDA is a popular free alternative), and macOS and iOS have VoiceOver.
- Your Browser’s Zoom Function: A simple but effective way to check for low-vision issues.
That’s it. With just these three things, you can start uncovering significant accessibility barriers on your website today. You don’t need to be a developer or an accessibility expert to begin. You just need a little curiosity and a willingness to see your website from a different angle.

Your First Manual Check: Keyboard-Only Navigation
Many people cannot use a mouse due to motor impairments, arthritis, or temporary injuries. They depend entirely on a keyboard or keyboard-emulating devices (like sip-and-puff switches) to browse the web. Because of this, ensuring your site works with a keyboard is one of the most fundamental tests you can perform.
Why Keyboard Testing is So Important
A keyboard test is a great proxy for overall accessibility. If a site works well with a keyboard, it’s likely to work well with a variety of other assistive technologies. The logic is simple: all interactive elements; links, buttons, form fields, menu items; must be reachable and usable without a mouse. When you test with a keyboard, you’re checking for this basic level of functionality. It’s a foundational check that exposes everything from hidden interactive elements to confusing page structures.
The Step-by-Step Keyboard Test
This test takes five minutes and can be incredibly revealing. Try it on your homepage right now.
- Go to your website and unplug your mouse. Seriously. Put it aside so you’re not tempted to use it.
- Use the Tab key. Start pressing the Tab key to move forward through all the interactive elements on the page. Watch where the focus goes. It should move logically from top to bottom, left to right, just as you would read the page.
- Use Shift + Tab to go backward. This is just as important. Can you move back through the elements in a logical reverse order?
- Use Enter and Space to activate things. When your focus is on a link or button, press Enter to activate it. For elements like checkboxes and some buttons, the Space key should also work.
- Use arrow keys for widgets. If you encounter dropdown menus, carousels, or navigation bars with submenus, try using the up, down, left, and right arrow keys to move through the options.
What to Look For (The Common Problems)
As you tab through your site, keep an eye out for these common keyboard accessibility issues:
- Focus Visibility: This is the most common problem. When you press the Tab key, can you see where you are on the page? There should be a clear, visible outline (often a blue or black ring) around the focused element. If you can’t tell what’s selected, the site is unusable for a keyboard-only user. This is a core requirement of the latest Web Content Accessibility Guidelines (WCAG).
- Logical Focus Order: Does the focus indicator move in a predictable path? For example, it should go from the logo to the main navigation, then to the main content, and finally to the footer. If it jumps from the header to the footer and then back to a random button in the middle of the page, the flow is broken and confusing.
- Keyboard Traps: This is a showstopper. A keyboard trap happens when you tab into an element, like a video player or a third-party chat widget, and you can’t tab out again. Your focus is stuck in a loop. The only way to escape is to reload the page. This makes entire sections of your website completely inaccessible.
- Skipping Interactive Elements: Does the focus indicator skip over anything you should be able to interact with? Sometimes, elements that look like buttons or links aren’t coded correctly, and the keyboard simply ignores them. If you can click it with a mouse, you must be able to reach it with a keyboard.
Dipping Your Toes into Screen Reader Testing
A screen reader is a software application that reads the content of a computer screen aloud. It’s the primary way that people who are blind or have severe low vision access digital content. Listening to your website with a screen reader provides a completely different perspective and can uncover issues you’d never notice visually.
What is a Screen Reader and Who Uses It?
Screen readers don’t just read text from top to bottom. They allow users to navigate through a page using its structure; jumping between headings, lists, links, and forms. This is why having a clean, logical heading structure (H1, H2, H3) is so important; it acts as a table of contents for screen reader users. People with some cognitive or learning disabilities also use screen readers to help with reading comprehension.
Getting Started with NVDA or VoiceOver
You don’t need to be an expert to do a basic screen reader check. The goal isn’t to become a power user overnight but to get a general sense of how your site sounds.
- On Windows: NVDA is a free, open-source, and very popular screen reader. You can download it and run it without installation. Windows also has a built-in tool called Narrator.
- On Mac/iPhone: VoiceOver is built-in. On a Mac, press Cmd + F5 to toggle it on and off. On an iPhone, you can enable it in the Accessibility settings.
Start by just letting it read your homepage from the top. Then, learn one or two basic commands, like how to jump to the next heading or the next link.
Your First Screen Reader Checks
With a screen reader running, listen for these common problems:
- Images without Alt Text: When a screen reader encounters an image without descriptive alt text, it might read the file name (“IMG_8734.jpg”) or just say “image” or “graphic.” This leaves a huge information gap. Good alt text describes the content and function of the image, so someone who can’t see it gets equivalent information.
- Meaningless Link Text: This is a huge one. Screen reader users often pull up a list of all the links on a page to quickly find what they’re looking for. If your links are all labeled “Click Here,” “Learn More,” or “Read More,” the list becomes a useless collection of identical, context-free phrases. Link text should always be descriptive. Instead of “Click here for our services,” the link itself should say “Our Web Design Services”.
- Incorrect Heading Structure: Listen to the headings on your page. Do they form a logical outline? A common mistake is to skip heading levels (e.g., going from an H1 to an H4) for stylistic reasons. For a screen reader user, this creates a disjointed and confusing structure. The main title of the page should be an H1, major sections should be H2s, and subsections should be H3s.
- Unlabeled Form Fields: This makes forms impossible to use. When you navigate to an input field (like for a name or email), the screen reader should announce the field’s label. If it doesn’t, the user has no idea what information to enter. The same goes for buttons; a button should be labeled “Submit Application,” not just “Button.”
A Simple Test for Low Vision: Browser Zoom
Many people have low vision, meaning they are not blind but have a visual impairment that isn’t correctable with glasses. They often use their browser’s zoom feature to enlarge content up to 400% of its original size. Testing for this is quick and reveals a different set of potential problems.
More Than Just Making Text Bigger
When a user zooms in, they aren’t just making the font bigger. On a well-designed website, the entire layout should adapt. This concept is known as “reflow.” Content should rearrange itself into a single, readable column, so the user doesn’t have to scroll horizontally back and forth to read each line of text. Horizontal scrolling at high zoom levels can be incredibly disorienting and makes reading very difficult.
How to Test with Zoom
This is another simple, five-minute test.
- Open your website.
- Press Ctrl and + (or Cmd and + on a Mac) to zoom in. Keep going until you reach 200%, and then push it all the way to 400%.
- Look for these issues:
- Horizontal Scrolling: Is a horizontal scrollbar appearing? If so, your content is not reflowing correctly. Users will have to pan left and right to read, which is a frustrating experience and a WCAG failure.
- Overlapping Content: Check if text is crashing into other text or if elements are overlapping, making them unreadable.
- Hidden Content: Does any content, especially buttons or important information, disappear off-screen when you zoom in? Sometimes, containers with fixed heights will cut off text as it gets larger.
A responsive design that works well on mobile devices often handles zoom well, but it’s not a guarantee. You still need to check it.
Checking Content and Readability
Accessibility isn’t just about technical code; it’s also about the words on the page. Content that is confusing, filled with jargon, or poorly structured creates barriers for everyone, but it can be especially difficult for people with cognitive or learning disabilities.
Is Your Language Simple and Clear?
The best way to test this is to read your content out loud. Does it sound like a human talking, or does it sound like a legal document? If you stumble over sentences or have to re-read them to understand the meaning, your language is probably too complex. Use simple words, write in the active voice, and keep sentences and paragraphs short. This isn’t about “dumbing down” your content; it’s about being clear and respectful of your audience’s time and cognitive energy.
Are Your Page Titles Descriptive?
Look at the text in your browser tab for each page on your site. This is the page title. It’s the first thing a screen reader announces when a new page loads, and it’s what people see in their browser history and bookmarks. A good page title is unique and descriptive. For example, a bad title for a contact page is just “Contact.” A much better title is “Contact Us – Acme Corporation.” It provides context and helps users orient themselves, especially if they have multiple tabs open.
Making Manual Testing a Habit
You don’t need to test every single page on your website tomorrow. The key is to start small and make it a regular practice.
Where to Start on Your Website
Begin with your site’s most critical user journeys. Don’t worry about that obscure blog post from 2015. Focus on the pages that have the biggest impact on your users and your business goals. Good places to start include:
- The homepage
- The main navigation menu
- The primary contact form
- The checkout or sign-up process
- Your top 3-5 most visited pages
Fixing one barrier on your contact form is more valuable than finding ten minor issues on a page nobody visits.
Don’t Aim for Perfection, Aim for Progress
Manual accessibility testing can feel overwhelming at first. You might find more issues than you expected. That’s okay. The goal is not to achieve a perfect website overnight. The goal is progress. Every barrier you find and remove makes your website better for someone. Celebrate the small wins. Each fix is a step toward a more inclusive experience for your users.
Involving Your Team
Accessibility is a team sport. Once you’re comfortable with these basic checks, encourage others on your team to try them.
- Developers can run keyboard tests before they merge new code.
- Designers can check color contrast and focus states in their mockups.
- Content writers can read their text aloud to check for clarity.
When everyone on the team has a basic understanding of these manual checks, accessibility becomes part of the workflow instead of an afterthought.

Start Your Manual Testing Today
Manual accessibility testing is an indispensable part of creating a truly accessible website. It shifts the focus from technical compliance to human experience, uncovering the barriers that automated tools can never see.
You have the tools you need to get started. Take ten minutes today and try a keyboard-only test on your homepage. Listen to it with a screen reader. You might be surprised by what you find.
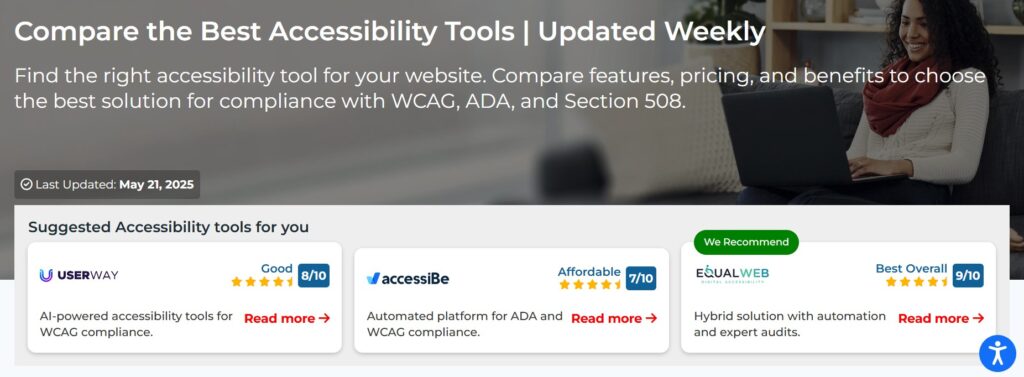
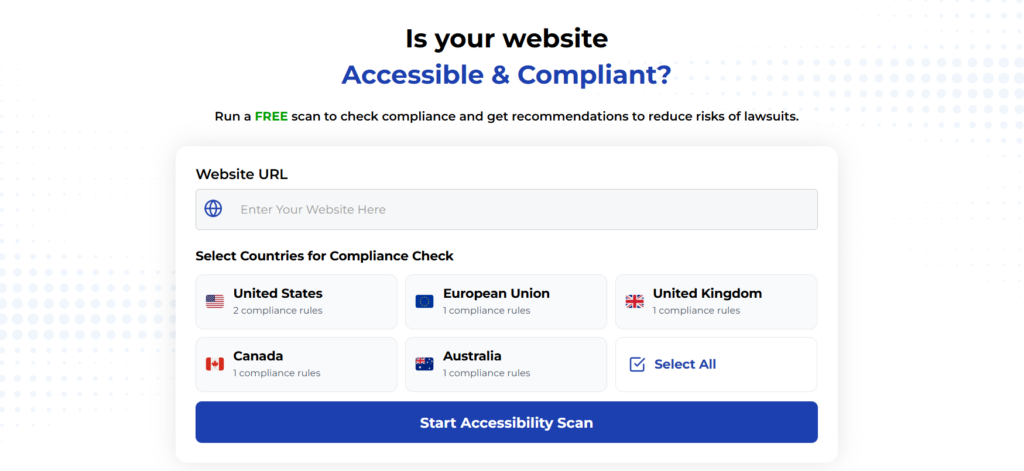
Using Automated Tools for Quick Insights (Accessibility-Test.org Scanner)
Automated testing tools provide a fast way to identify many common accessibility issues. They can quickly scan your website and point out problems that might be difficult for people with disabilities to overcome.
Visit Our Tools Comparison Page!
Run a FREE scan to check compliance and get recommendations to reduce risks of lawsuits
Final Thoughts
After you’ve done your initial manual checks, use them to add context to an automated scan. Run a free scan with the Accessibility-Test.org scanner to get a broader view of technical issues across your site. By combining the speed of automation with the irreplaceable insight of manual testing, you’ll be well on your way to making your corner of the web more welcoming for everyone.
Run a Free Scan to Find E-commerce Accessibility Barriers
Curious about where your site stands? An automated scan is a great first step to identify potential accessibility issues on your e-commerce platform. Run a free scan on our website today to get an initial report on your site’s accessibility health.
Want More Help?
Try our free website accessibility scanner to identify heading structure issues and other accessibility problems on your site. Our tool provides clear recommendations for fixes that can be implemented quickly.
Join our community of developers committed to accessibility. Share your experiences, ask questions, and learn from others who are working to make the web more accessible.