


Mobile App Accessibility Testing Protocol
When creating mobile apps, we need to make sure they work for everyone, including people with disabilities. This article provides a detailed set of steps to test your iOS and Android apps for accessibility issues. Our testing protocol helps you find and fix problems that might prevent some users from using your app effectively. By following these steps, you’ll be better prepared to meet accessibility standards, avoid legal issues, and reach a wider audience.
Platform-Specific Requirements
Mobile accessibility testing requires different approaches depending on whether you’re working with iOS or Android. Each platform has its own screen readers, accessibility features, and testing tools. Understanding these differences is essential for thorough testing.
iOS VoiceOver Testing
VoiceOver is Apple’s built-in screen reader that helps blind and low-vision users navigate iOS devices. Testing with VoiceOver should be a key part of your iOS app testing process.
To start testing with VoiceOver:
- Turn on VoiceOver by going to Settings > Accessibility > VoiceOver
- Learn basic gestures: tap once to select an item, double-tap to activate the selected item, and swipe left or right to move between elements
- Use the three-finger swipe to scroll through pages
- Double-tap with two fingers to start or stop an action
- Use the “magic tap” (two-finger double-tap) for answering calls or starting/stopping media
When testing your app with VoiceOver, pay attention to these areas:
- Does every interactive element have a clear label that describes its purpose?
- Can all app functions be accessed using VoiceOver?
- Are custom controls properly labeled and usable?
- Do images that convey information have text descriptions?
- Is the reading order logical?
Common issues found during VoiceOver testing include missing alt text, incorrect reading order, unlabeled buttons, and custom controls that don’t work with VoiceOver. Each screen should be tested by navigating through all elements to verify that VoiceOver reads them correctly and in a logical order.
For dynamic content, verify that VoiceOver announces changes to the screen, such as error messages or updated information. This helps users know when something has changed without seeing the visual cues.
Rotor Customization Checks
The Rotor is a powerful VoiceOver feature that acts like a virtual dial, allowing users to quickly access different navigation methods. Testing the Rotor helps ensure your app works with various navigation techniques.
To use the Rotor:
- With VoiceOver on, rotate two fingers on the screen as if turning a dial
- Move through options like Headings, Links, Form Controls, etc.
- Once you select a category, swipe up or down to navigate by that element type
When testing with the Rotor, check that:
- Headings are properly marked up so users can navigate by headings
- Lists are correctly implemented to allow list navigation
- Links and buttons are properly identified
- Form controls are labeled and functional when accessed via Rotor
- Custom actions work correctly
The Rotor should provide efficient ways to navigate your app. If users can’t move through content by headings or other structural elements, your app may need improved semantic markup. Testing should verify that all navigation methods available in the Rotor work as expected with your app’s content.
Android TalkBack Implementation
TalkBack is Google’s screen reader for Android devices. Like VoiceOver, it converts visual information to speech to help blind and low-vision users.
To test with TalkBack:
- Enable TalkBack in Settings > Accessibility > TalkBack
- Learn the basic gestures: single tap to select, double tap to activate, swipe right/left to move forward/backward
- Use two fingers to scroll
- Draw an “L” shape to access the local context menu
When testing your Android app with TalkBack, check these areas:
- Are all UI elements properly labeled?
- Can users navigate through all screens and functions?
- Do complex custom views support TalkBack gestures?
- Are state changes announced (like when a checkbox is checked)?
- Does the focus order make sense?
Pay special attention to custom views, as these often lack proper TalkBack support. Each custom view should be tested to ensure it announces its purpose, state, and any changes to its state.
Android’s content descriptions (similar to alt text in iOS) need to be checked for all important elements. The descriptions should be concise but clear about the element’s purpose or information.
Testing should also verify that TalkBack works with any custom gestures in your app. If your app uses specific gestures for certain actions, make sure there are accessible alternatives that work with TalkBack enabled.

Cross-Platform Concerns
Some accessibility issues affect both iOS and Android apps. Addressing these common problems can improve the experience for all users regardless of platform.
Touch Target Sizing
Small touch targets are a major barrier for users with motor control difficulties, tremors, or large fingers. Both Apple and Google provide guidelines for minimum touch target sizes.
For proper touch target sizing:
- iOS recommends touch targets of at least 44×44 points
- Android suggests at least 48×48 density-independent pixels (dp)
- Interactive elements should have adequate spacing between them (at least 8dp or points)
To test touch target sizes:
- Try using the app with a finger (not just a stylus or precise pointer)
- Attempt to activate each control without accidentally triggering nearby controls
- Ask someone with larger fingers or minor tremors to test difficult areas
- Use testing tools that highlight touch target sizes
Common problems include buttons that are too small, links placed too close together, or clickable areas that don’t match the visual appearance of the control. For example, if a button looks large but only a small part of it responds to touches, this creates user frustration.
For elements that must remain small due to design constraints, consider enlarging the touch area beyond the visible element. This can be done using padding or by extending the clickable area without changing the visual size.
Gesture Alternative Patterns
Many mobile apps rely on gestures like pinch-to-zoom, swipe, or shake. However, these gestures can be difficult or impossible for some users with mobility impairments.
When implementing and testing gesture alternatives:
- Provide button-based alternatives for essential gesture controls
- Ensure that multi-finger gestures have single-finger alternatives
- Allow customization of gesture sensitivity where possible
- Test that all app functions are accessible without complex gestures
For example, if your app uses pinch-to-zoom, also provide zoom buttons or another mechanism to achieve the same result. If you use shake-to-refresh, add a refresh button on screen.
Testing gesture alternatives requires thinking beyond the typical user experience. Try navigating your app:
- Using only single-finger gestures
- Without using any gestures beyond simple taps
- With screen readers enabled, which modify how gestures work
Each critical function in your app should be accessible through multiple interaction methods. This approach not only helps users with disabilities but also improves usability in various contexts, such as when users are in motion or using the device with one hand.

Automation Strategies
While manual testing is essential, automated testing can help catch accessibility issues early and ensure they don’t return in future updates.
XCTest Accessibility Checks
XCTest is Apple’s testing framework for iOS apps and includes features specifically for accessibility testing.
To implement XCTest accessibility checks:
- Create UI tests that verify accessibility labels are present
- Test navigation flow using accessibility identifiers
- Verify that all interactive elements are accessible
- Check reading order and grouping of related elements
Example areas to test with XCTest:
- Verify all images have accessibility labels
- Check that buttons and controls have clear accessibility identifiers
- Test that the accessibility hierarchy makes sense
- Confirm that focus moves in a logical order
Automated testing with XCTest can be integrated into your continuous integration pipeline to catch accessibility regressions before they reach users. Regular automated tests help maintain accessibility over time, even as features are added or modified.
When setting up XCTest for accessibility, focus on creating tests that validate the core user journeys through your app using only accessibility properties. This helps ensure that screen reader users can complete essential tasks.
Espresso Test Scripts
Espresso is Android’s UI testing framework and can be used to verify accessibility features in Android apps.
To use Espresso for accessibility testing:
- Write tests that check for content descriptions on important elements
- Verify focus order and navigation
- Test custom views for proper accessibility implementation
- Check that state changes are properly announced
Espresso can be used to verify:
- Presence of content descriptions on images and icons
- Proper labeling of form fields and buttons
- Logical focus order when navigating with a keyboard or switch device
- Proper implementation of Android’s accessibility services
Like XCTest, Espresso tests can be integrated into your development workflow to catch issues early. By automating basic accessibility checks, you free up time for more complex manual testing.
When writing Espresso tests, consider creating a specific test suite focused on accessibility concerns. This allows you to run these tests separately and identify accessibility issues more easily.
Testing with Real Devices
While simulators and emulators are useful, testing on real devices provides more accurate results, especially for accessibility features.
Device Variation Testing
Different devices have different screen sizes, resolutions, and implementations of accessibility features. Testing across multiple devices helps catch issues that might appear on only certain device types.
When testing across devices:
- Try at least one older device and one newer device for each platform
- Test on different screen sizes to verify layout adaptability
- Check both phones and tablets if your app supports both
- Verify that screen readers work consistently across devices
Device-specific issues often arise with custom UI elements or when using newer accessibility features that might not be supported on older operating systems. Testing on real devices helps identify these compatibility issues before users encounter them.
For smaller teams with limited resources, consider using device labs or testing services that provide access to multiple device types. Even testing on a few representative devices is better than testing only on simulators.
Operating System Version Testing
Each new version of iOS and Android brings changes to accessibility features. Testing across OS versions ensures your app works for users who haven’t upgraded.
Key aspects to check across OS versions:
- Basic screen reader functionality
- Support for newer accessibility features
- Backwards compatibility with older accessibility APIs
- Consistent behavior of custom accessibility implementations
If your app uses newer accessibility APIs, make sure to provide fallbacks for users on older operating systems. This ensures all users have access to your app’s core functionality, even if some enhanced accessibility features aren’t available.
Common Mobile Accessibility Issues
Certain accessibility problems appear frequently in mobile apps. Knowing these common issues helps you identify and fix them in your own applications.
Color and Contrast Problems
Poor color contrast makes text difficult to read for many users, including those with low vision, color blindness, or those using devices in bright sunlight.
To test for color and contrast issues:
- Use contrast checking tools to verify text meets WCAG AA standards (4.5:1 for normal text, 3:1 for large text)
- Test your app in different lighting conditions
- Check how your app appears in grayscale to spot potential issues for color-blind users
- Verify that information isn’t conveyed by color alone
Common contrast problems include light gray text on white backgrounds, colored text on colored backgrounds, and insufficient contrast for icons and UI controls. All text should meet minimum contrast requirements, and essential functions should be identifiable without relying on color perception.
Tools like Contrast Analyzer or built-in accessibility auditing tools can help identify contrast issues. Many of these tools can be used during development to catch problems before they reach testing.
Text Sizing and Readability
Many users adjust text size on their devices to improve readability. Your app should support these settings and remain functional with larger text.
To test text sizing:
- Enable larger text in device settings (Dynamic Type in iOS, Font Size in Android)
- Verify that all text in your app increases accordingly
- Check that layouts adapt to accommodate larger text without truncation
- Ensure that important controls remain visible and usable
Issues often arise when text containers have fixed sizes, causing text to be cut off or overflow its boundaries. Text that doesn’t respond to system size settings creates barriers for users with low vision who rely on larger text to use their devices.
Testing should verify that your app supports the full range of system text sizes, from smallest to largest. Pay special attention to form fields, buttons with text labels, and areas with limited space.

Navigation and Flow
Logical navigation flow is essential for all users but particularly important for those using screen readers or switch control devices.
When testing navigation and flow:
- Verify that focus order follows a logical path (usually top to bottom, left to right in Western languages)
- Check that related elements are grouped together
- Ensure that modal dialogs and pop-ups trap focus appropriately
- Test keyboard navigation if supported (particularly for tablet apps)
Navigation problems include focus jumping randomly between elements, important controls being skipped in the navigation order, or users becoming trapped in sections of the app. Each screen should be tested by navigating through all elements using only a screen reader to verify the experience makes sense.
For complex screens, create a map of the expected focus order and verify that actual behavior matches this expectation. This helps identify issues with the navigation flow that might not be immediately obvious during casual testing.
Best Practices for Developers
Incorporating accessibility from the beginning of development is more effective than trying to add it later. These best practices help teams build accessibility into their workflow.
Building Accessibility from the Start
Including accessibility in the initial design and development phases saves time and resources compared to retrofitting existing apps.
Key practices for building in accessibility:
- Include accessibility requirements in design specifications
- Create component libraries with built-in accessibility features
- Use standard UI elements when possible, as they usually have better accessibility support
- Train developers on platform-specific accessibility APIs
By considering accessibility from the beginning, teams can avoid common pitfalls and design patterns that create barriers. This approach also helps distribute the work of implementing accessibility features throughout the development process rather than making it a last-minute effort.
When designing new features, consider how they will work with screen readers and other assistive technologies. Document these considerations as part of the feature specification to ensure they’re implemented correctly.
Regular Testing Schedule
Accessibility testing should be an ongoing process, not a one-time event before release.
Effective testing schedules include:
- Quick accessibility checks during each development sprint
- More thorough testing before major releases
- Periodic review of the entire app from an accessibility perspective
- Testing after significant OS updates that might affect accessibility features
Regular testing helps catch accessibility regressions and ensures that new features maintain accessibility standards. It also helps team members build accessibility knowledge over time, making future development more efficient.
Consider including accessibility testing as part of your definition of “done” for user stories or features. This ensures that accessibility is considered at every stage of development rather than being treated as a separate concern.
User Feedback Integration
Real user feedback provides insights that automated tools and internal testing can’t capture.
To effectively integrate user feedback:
- Recruit users with disabilities for usability testing
- Provide accessible feedback mechanisms within your app
- Monitor app store reviews and support requests for accessibility issues
- Establish relationships with disability organizations for feedback
Users with disabilities often develop workarounds for common issues and can provide valuable insights into how they actually use your app. Their feedback helps prioritize fixes and improvements based on real-world impact.
When conducting usability testing with users with disabilities, focus on observing how they naturally use your app rather than guiding them through specific tasks. This reveals navigation patterns and expectations that might differ from your assumptions.
Documentation and Reporting
Proper documentation of accessibility features and issues helps teams track progress and communicate with stakeholders.

Creating Accessibility Reports
Detailed reports help teams understand the current state of accessibility and plan improvements.
Effective accessibility reports include:
- List of issues found, categorized by severity
- Screenshots or recordings demonstrating problems
- Steps to reproduce each issue
- Recommendations for fixes
- References to relevant accessibility guidelines
Reports should prioritize issues based on their impact on users, with blocking issues (those that prevent core functionality) given highest priority. This helps teams allocate resources effectively and address the most critical problems first.
Regular reporting also helps track progress over time and demonstrate the value of accessibility work to stakeholders. Comparing current results to previous testing shows improvements and highlights areas that need continued attention.
Accessibility Statement
An accessibility statement helps users understand what to expect from your app and how to get help with accessibility issues.
Key elements of an accessibility statement:
- Your commitment to accessibility
- Accessibility features included in the app
- Known limitations or issues
- How users can report accessibility problems
- Timeline for addressing known issues
The statement should be written in plain language and available within the app, typically in settings or help sections. It demonstrates transparency and shows users that you value their experience.
An honest accessibility statement builds trust with users by acknowledging where your app might fall short while showing your commitment to improvement. It also provides a way for users to help you identify and address issues they encounter.
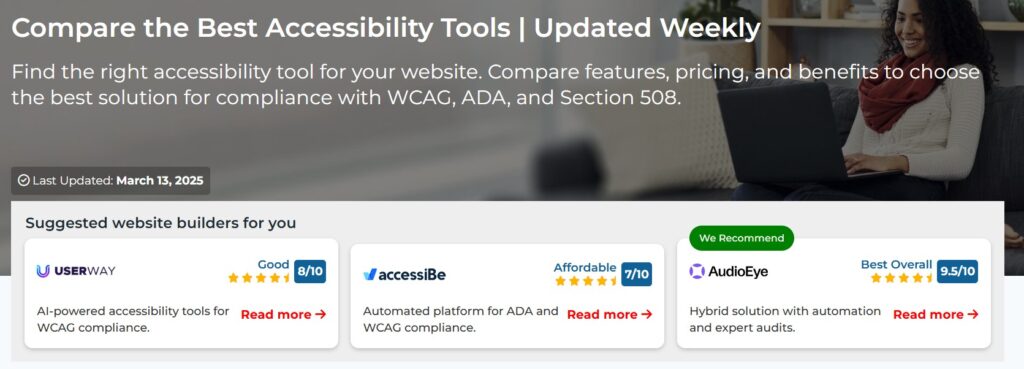
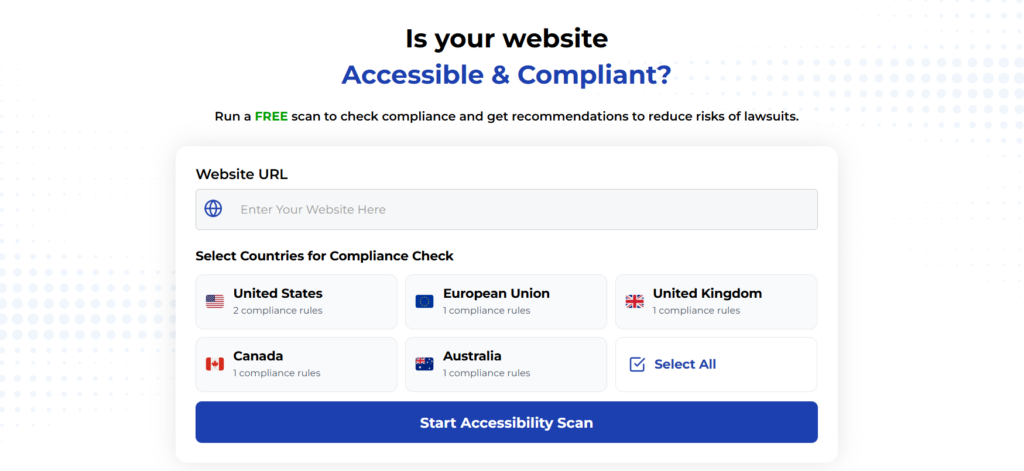
Using Automated Tools for Quick Insights (Accessibility-Test.org Scanner)
Automated testing tools provide a fast way to identify many common accessibility issues. They can quickly scan your website and point out problems that might be difficult for people with disabilities to overcome.
Visit Our Tools Comparison Page!
Run a FREE scan to check compliance and get recommendations to reduce risks of lawsuits
To Conclude The React Component Best Practices
Testing mobile apps for accessibility requires attention to platform-specific requirements, common cross-platform concerns, and a mix of manual and automated testing strategies. By following the protocol outlined in this article, you can create apps that work better for all users, including those with disabilities.
Remember that accessibility is an ongoing process, not a one-time task. Regular testing, user feedback, and continuous improvement help maintain and enhance the accessibility of your mobile applications over time.
Taking the time to properly test and address accessibility issues not only helps you meet legal requirements but also expands your user base and creates a better experience for everyone.
Run a FREE scan to check compliance and get recommendations to reduce risks of lawsuits.